The JSON CGIs, from the JSON branch of core, have been officially released with Nagios Core 4.0.7!
The original design goals were:
- To provide all information available in current CGIs in JSON format.
- Place the presentation responsibility on the client to minimize network traffic and server load.
- Perform operations on the server side that are significantly more easily done there.
- Spark community developers to create new Nagios Core UI’s from the easy to work with JSON from the CGIs.
The CGIs provide an API to query object, status, and historical information through GET requests. They use the same authentication as other CGIs. Once queried, they return valid JSON that can be parsed into JavaScript objects for client side models and processing. The API is very robust, providing multiple ways to limit queries – name/descriptions, host/service groups, update/changes times, among many others.
The three new CGIs are:
- objectjson.cgi (object configuration)
- statusjson.cgi (status information)
- archivejson.cgi (historical logs)
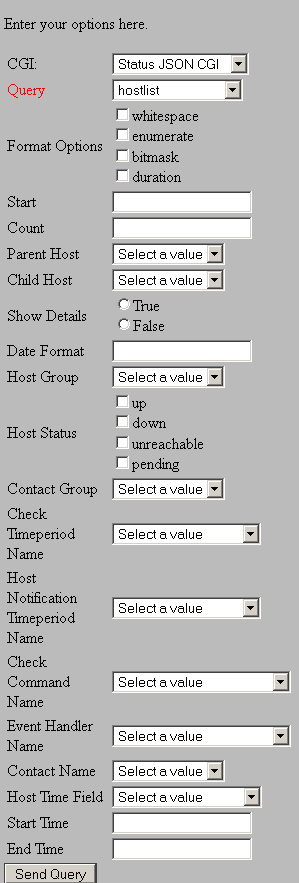
Additionally, a new web app is included – jsonquery.html & jsonquery.js. This is a small UI for crafting GET requests, it can be used to trial specific parameters for GET requests, or to just explore the api. It is also the easiest way to get acquainted with the new CGIs.
Installing the JSON CGIs:
|
1 2 3 4 5 6 7 |
cd /tmp wget http://prdownloads.sourceforge.net/sourceforge/nagios/nagios-4.0.7.tar.gz tar vfxz nagios-4.0.7.tar.gz cd nagios-4.0.7 ./configure (specify extra configure options as needed) make all make install |
You can run the "./configure" command with extra configuration options as needed.
Post install, you should find the 3 new CGIs in /usr/local/nagios/sbin, and the jsonquery html and js files in /usr/local/nagios/share.
To get started using the CGIs: Browse to the jsonquery.html url in your web browser:
http://<nagios server>/nagios/jsonquery.html
You should see a small UI just waiting to be explored:

- Choose Status JSON CGI from the CGI dropdown
- Select hostlist for the query dropdown
- Click the Send Query button
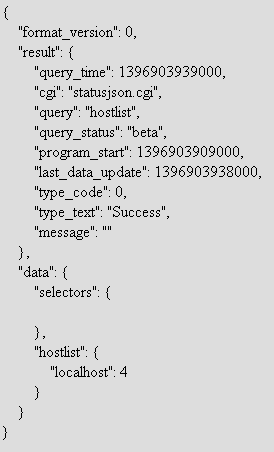
- The right hand pane should now display a prettified JavaScript object
- You can then save the url, parametrize it, etc for use in ajax calls and/or integration into custom front-ends.


The query above was fairly basic. Let’s query some more specific information:
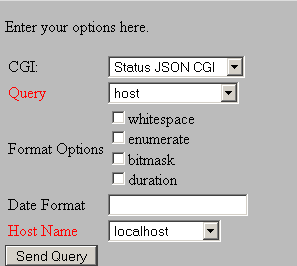
- Choose Status JSON CGI from the CGI dropdown
- Select host for the query dropdown
- Select a hostname from the Host Name dropdown
- Click the Send Query button
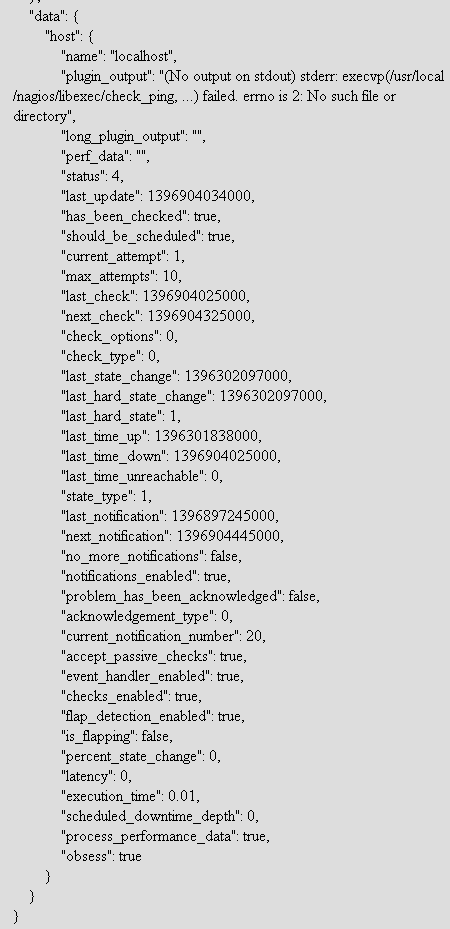
- You should now see detailed information for the specific host returned in the JSON


Feel free to play around with the numerous options. The CGIs are highly versatile and work well with ajax loops for custom front-ends and client-side models. This is version 1 of the CGIs, so if you find any bugs, please report them to http://tracker.nagios.org. More features are planned, so stay tuned!
If you utilize the new feature to create a new addon for Nagios, please share it back with the community by posting it on the Nagios Exchange.
In part 2 (coming soon) I will cover some use cases for the new CGIs and provide a short walk-through covering the creation of a (small) custom front-end.
Remember, Nagios World Conference 2014 is coming up in October. Register here for 10% off your conference pass. Act now, because this offer won’t last long!


Hi,
Good tool. I can see numerous possibilities.
When are you publishing Part 2?
Regards
Tom
Hi,
Is it possible to obtain all the current services in critical status applying filters such as “Not Flapping” or “Not In Scheduled Downtime” ???
At this moment i’m able to obtain this data but without any filter, something like this.
http://locaclhost/nagios/cgi-bin/statusjson.cgi?query=servicelist&formatoptions=whitespace&parenthost=none&childhost=none&hoststatus=up&servicestatus=pending&parentservice=none&childservice=none
As you can see this json query returns all services in pending status.
Greetings
Hi,
Thank you for this post.
I’ve tried it with Nagios 4.0.8 (as is, out of the box!) and it works fine also with filters, as asked by Angel. For example, all the services with critical status: /cgi-bin/statusjson.cgi?query=servicelist&servicestatus=critical&details=true
The allowed values and syntax can be found at /cgi-bin/statusjson.cgi
—
Regards,
Menashè