Event handlers have been a major part of Nagios Core and Nagios XI for long time and can greatly increase the efficiency of your network and decrease incident response time. From restarting downed services, forwarding emails to a ticketing systems, or updating thousands of servers, the possibilities for event handlers are limited only by your imagination. Below, you will find the introductory portion of the documentation which will walk you through the creation of your first event handler in its most basic form. If the following example isn’t enough, the full documentation includes a complete tutorial for event handler macros, and more advanced users can learn how to fully customize their Nagios environment.
Step I. Create a command in XI for the event handler
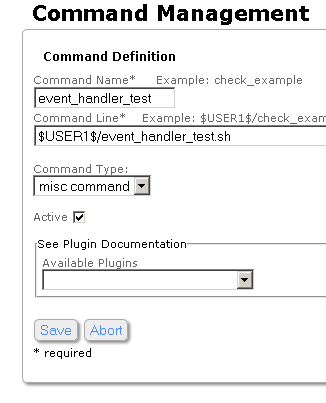
In XI, go to the CCM (Configure → Core Config Manager → Commands). Click “Add New” in the right hand pane. Give the command a name, we will use “event_handler_test” for this example.
Now we need to define the “Command Line”. “$USER1$” references the folder “/usr/local/nagios/libexec” from the resources.cfg file. This is the default path for plugins and scripts in XI. We will create a script later on to be called by this command, and for the sake of uniformity, we will name our script “event_handler_test.sh”.
As this command will not be used to check hosts nor services, but will be used as an event handler, set the “Command Type” dropdown to “misc command”.
Make sure the “Active” box is checked.
The final command definition should resemble the image to the right. Click save when finished.
Step II. Create a dummy host
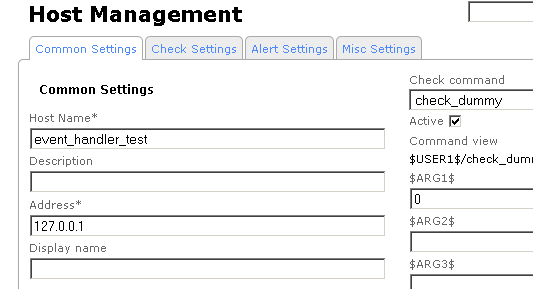
In XI, go to the CCM (Configure → Core Config Manager → Monitoring → Hosts). Click “Add New”. We will set the “Host Name” field as “event_handler_test”.
As this is just a mock up, set “Address” to the localhost “127.0.0.1”.
Choose “check_dummy” for the “Check command”.
Enter “0” for $ARG1$. This forces the “check_dummy” command to always return “0” (UP).
Clicking “Test Check Command” should output “OK”, this means you have set up the command correctly.
Set the required defaults:
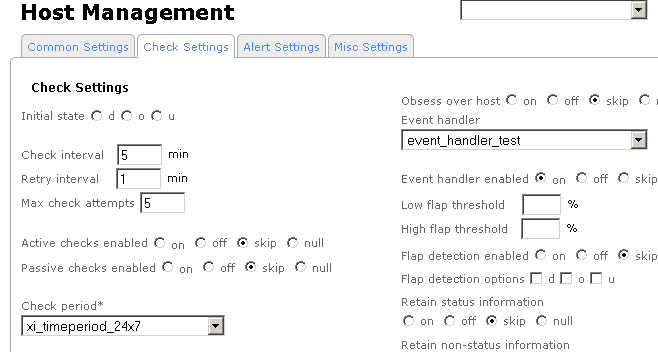
Under the “Check Settings” tab, enter “5” for “Check interval” and “Max retry attempts”, and “1” for “Retry interval”.
Set the “Check period” dropdown to “xi_timeperiod_24x7”
Under the “Alert Settings” tab, set the “notification period” dropdown to “xi_timeperiod_24x7”.
Step III. Add the event handler to the dummy host
Under the tab “Check Settings” for the dummy host choose “event_handler_test” in the “Event handler” dropdown box.
Enable the event handler by clicking the bullet “on” for the “Event handler enabled” option. Save out and “Apply configuration”.
Step IV. Create a script for the handler to run
Now that the XI event handler and host object are configured, we need to create a script to be run by the handler. The first iteration of the script will just output some *very* basic information to a text file in /tmp. In the proceeding sections of this document we will add functionality and complexities to the script and command of the handler (mostly macros and script logic). But before we get to the fun stuff, lets make sure the basic script works.
Open up a terminal to the XI server and navigate to plugin directory.
cd /usr/local/nagios/libexec
Now create a file named “event_handler_test.sh”, make it executable and edit it:
touch event_handler_test.sh

chmod +x event_handler_test.sh

nano event_handler_test.sh
Paste the following into the file:
#!/bin/bash

DATE=$(date) #sets the DATE variable to the output of the 'date' command

echo "The host has changed state at $DATE" > /tmp/hostinfo.txt #echos text to a file including the contents of the DATE variable.
Save out.
Step V. Test the event handler
Now that everything is in place, we need to force the dummy host into a down state to verify if the hostinfo.txt file is created in /tmp. The easiest was to do this is to submit a passive check with the “Check Result” of “DOWN”. This should trigger the event handler as it will register as a state change.
The XI web interface, go to → Home → Host Detail → Click the Host “event_handler_test” → Click the “Advanced” tab → And then Click “Submit passive check result” under the “Commands” list. Change the “Check Result” dropdown menu to “DOWN” and input “TEST” for the “Check Output” field.
Click “Commit”, and then done. You should see the host change to a down state after a moment or two. Now lets check the hostinfo.txt file from the XI server’s CLI:
cat /tmp/hostinfo.txt
You should see output resembling:
The host has changed state at Sun Jun 2 22:36:22 CDT 2013
Congratulations! You have created your first event handler. With this knowledge, you can automate nearly anything in your environment to keep it running smoothly. Don’t know bash scripting? No problem! The full document, linked below, includes a number of use cases in bash to get you started. From emailing a ticketing system to performing yum updates, event handlers can help you create a more self-sufficient network environment and integrate with other systems in your organization.
For the full documentation, click on the link below: Introduction to Event Handlers


