Author Archive for Ludmil Miltchev

Audio Alerts With Nagios XI

Many of you have asked about generating audio alerts in Nagios XI. Troy Lea put together a document on doing exactly that on Raspberry Pi. Even though, this is not an officially supported setup, we feel that the document would be beneficial to many Nagios XI users. You can view the document here:

https://assets.nagios.com/downloads/nagiosxi/docs/Audio-Alerts-With-Nagios-XI.pdf

We would love to here your feedback! Did it work for you? Have you tried setting up audio alerts on a different platform? Have you found an easier solution?

Happy Monitoring!

How To Set Up A Nagios XI License Maintenance Status Check

There are a few ways to set up a Nagios XI license maintenance status check. It is also very easy to check the Nagios XI license maintenance status inside Nagios XI. Here’s how…

Once logged in to Nagios XI you can navigate to the Admin menu then click on the License Information link on the left (However, many administrators simply forget to do so!). From the License Information screen you can view the time remaining on your license and/or click the renew now link to begin the renewal process. That’s all there is to it; nice and easy!

Setting Up a license Status Check in Nagios XI

Some Nagios XI users showed interest in setting up a license status check in XI. Having such a check makes perfect sense.  If you were notified that your license is about to expire, you would renew it on time thus avoiding any possible service interruptions. Also, you may be running several Nagios XI instances. You wouldn’t want to log in to each one just to check when each license expires. You could monitor all of the licenses from one central Nagios XI server.

I wrote a small bash script, which can be used to set up a license status check in XI. You can download the plugin from here:

http://assets.nagios.com/downloads/nagiosxi/scripts/check_license.sh

Install it as you would normally install any other plugin in Nagios XI.

Admin -> Manage Plugins -> Browse -> check_license.sh -> Upload Plugin

You can test the plugin from the command line by running:

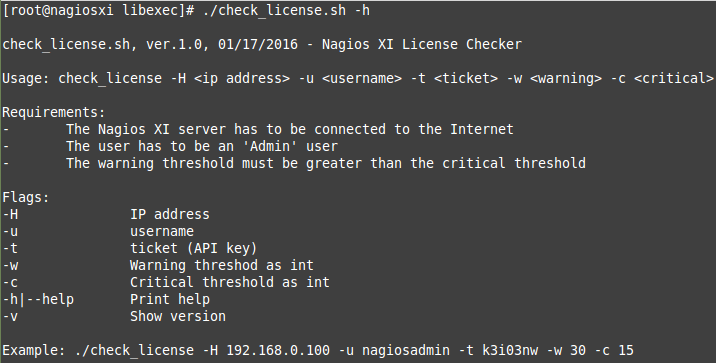
To view the usage (help) menu, run the plugin with passing a “-h” or “–help” flag.

nagios license status check

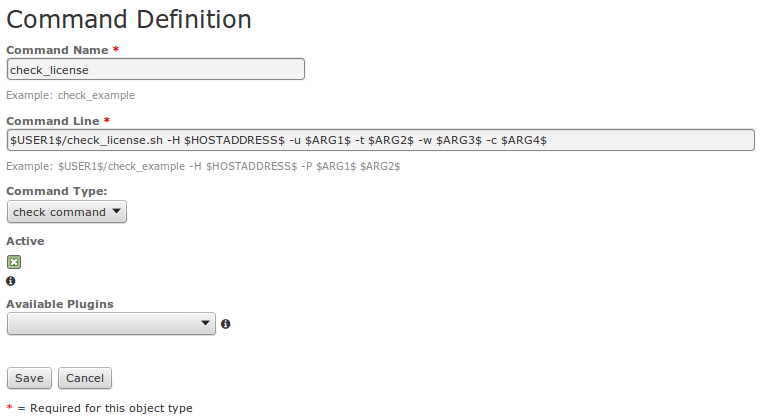
After you verify that the plugin works from the command line (see the example in the help menu), you can proceed with setting up a command and a service check under the Core Config Manager in Nagios XI.

check nagios license status


nagios check license

Save and Apply Configuration.

From the Nagios XI web interface go to the “Service Detail” menu and click on the newly added service. Schedule a forced immediate check to make sure the check returns the expected output.

service detail screen of license check status in nagios xi

For more information, please review our documentation (“Nagios XI – How To Set Up A Nagios XI License Maintenance Status Check“):

https://assets.nagios.com/downloads/nagiosxi/docs/How-To-Set-Up-A-Nagios-XI-License-Maintenance-Status-Check.pdf

Happy Monitoring!

Utilizing a RAM Disk in Nagios XI – the Easy Way

If you have a very large Nagios XI instance, and you are experiencing high I\O wait time, and high check latencies, you have a couple of options – buy extremely fast hard drives or add RAM disk on the local filesystem.

Setting up a RAM disk manually requires a modification of numerous files – nagios.cfg, config.inc.php, npcd.cfg, etc. Skipping just one of the required steps or making a typo will result in various issues with performance data files not being processed, graphs not being displayed, etc.

In order to make the process of utilizing a RAM disk in Nagios XI a lot easier for users, we developed a bash script that automates the whole process. All you need to do now is run four simple commands:

The script will check for old or incomplete RAM disk installs, and will exit if any are found. If no previous RAM disk installs are found, the script will:

1. Backup all of the configs that are about to be modified and place them in the newly created “/tmp/ramdiskbackup/” directory.

2. Determine the recommended size of the RAM disk that is needed, and set it up automatically. You have an option to change the size of the RAM disk if you need to use a different value.

3. Modify various configs such as nagios.cfg, config.inc.php, npcd.cfg, etc.

4. Restart services.

5. Give you a confirmation that the RAM disk was installed successfully.

If you prefer to set up a RAM disk manually, please follow the steps outlined in our documentation (under the “Manual RAM Disk Installation” section):

https://assets.nagios.com/downloads/nagiosxi/docs/Utilizing_A_RAM_Disk_In_NagiosXI.pdf

As always, we would appreciate any feedback – good or bad, tips for improvement, etc.

Happy monitoring!

How To Upgrade Nagios XI From Web UI. (How to Upgrade to Nagios XI 5.)

Upgrading to Nagios Xi 5?

If you are using Nagios XI 2014 or later, you can upgrade your Nagios XI instance easily from the web UI, provided your server is connected to the Internet.

Upgrade Nagios XI From Web UI

Here’s how you do it:

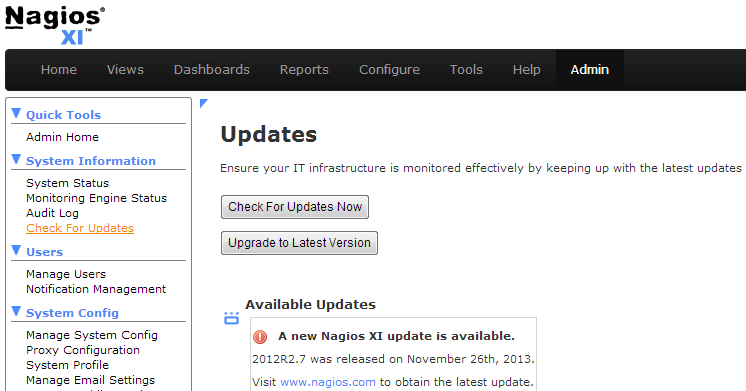
From the Nagios XI web interface navigate to the Admin menu, click Check for Updates menu on the left, then click Check For Updates Now. If an update exists, the most recent version will be displayed and you can click the Upgrade to Latest Version button to start the upgrade process.

Note: If you are running the most current version, the Upgrade to Latest Version button will not be displayed.

Check For Updates

Continue reading ‘How To Upgrade Nagios XI From Web UI. (How to Upgrade to Nagios XI 5.)’